
使用Taro-next将个人网盘功能扩展到微信小程序
前言
笔者之前实现了一个 PC 端的个人网盘功能,包含断点续传、文件秒传的文件管理系统,具体请参考文章**《断点续传与个人网盘系统的前后端设计》**
于是构思想将个人网盘功能扩展到小程序,沿用之前的后端(接口基本不需要改动),只需要完成移动端的 UI 实现即可。又由于 PC 端是基于 Vue 实现的,为了方便开发所以想直接采用跨平台框架,将 vue 代码转成小程序,而且这样还可以考虑后续转出 H5 或原生手机客户端等。
基于功能的原因,该小程序原则上不可能通过审核,所以只会作为个人练手项目。
跨平台框架选型
关于跨平台框架的选型,对比了当前主要用的 3 个框架
- mpvue: 美团开源的使用 Vue.js 开发小程序的前端框架,但当前好像好久没人维护了
- uniapp: uni-app 是一个使用 Vue.js 开发小程序、H5、App 的统一前端框架
- Taro-next: 京东开源的多端开发框架,2.X 版本是需使用 React 的,当前 beta3.X 版本对 vue 加入了支持。
对比了下,最终还是觉得选用 Taro-next 进行开发,虽然当前还是 beta 版,但是文档已经完善了,基本不影响使用。
安装与启动
Taro 安装参考官方文档,先全局安装 Taro 脚手架,再初始化一个项目,安装依赖。
使用npm run dev:weapp启动开发环境,然后使用微信开发者工具导入项目即可进行预览(最好申请一个小程序 Id,以便后续可以真机预览等功能)。
引入 Vant-weapp UI 框架
可以直接下载 vant-weapp 的生成包,直接放在目录下。然后就可以在页面的配置下引入自定义组件,Taro 会自动将这些同步到打包后的文件夹。微信小程序打包的时候也会自动去除没用到的包。
// index.config.js
export default {
  usingComponents: {
    "van-icon": "../../components/vant/icon/index",
    "van-action-sheet": "../../components/vant/action-sheet/index",
    "van-notify": "../../components/vant/notify/index",
    "van-dialog": "../../components/vant/dialog/index",
    "van-field": "../../components/vant/field/index",
    "van-checkbox": "../../components/vant/checkbox/index",
    "van-checkbox-group": "../../components/vant/checkbox-group/index",
    "van-progress": "../../components/vant/progress/index",
    "van-toast": "../../components/vant/toast/index",
  },
};
具体请参考:
另外,一些 Vant 的全局组件可以挂载到 Vue 的实例上,方便使用。
// app.js
import Vue from "vue";
// ...
import Notify from "./components/vant/notify/notify";
import Dialog from "./components/vant/dialog/dialog";
import Toast from "./components/vant/toast/toast";
// ...
Vue.prototype.$notify = Notify;
Vue.prototype.$dialog = Dialog;
Vue.prototype.$toast = Toast;
// ...
const App = new Vue({
  store,
  onShow(options) {},
  render(h) {
    return h("block", this.$slots.default);
  },
});
export default App;
使用时需注意,vant 该 3 个组件是要先定义默认节点的,要在一个全局的 vue 中加入以下节点代码
<van-notify id="van-notify" />
<van-dialog id="van-dialog" />
<van-toast id="van-toast" />
然后就可以在 vue 中使用
// Notify
this.$notify({ type: "danger", message: e || "登录失败", duration: 1000 });

// Dialog
this.$dialog
  .confirm({
    message:
      "此操作会将文件移动到回收站,你可在一个月内进行恢复操作,一个月后将永久删除",
  })
  .then(() => {
    // do something
  })
  .catch(() => {
    // on cancel
  });

// Toast
this.$toast.loading({
  mask: true,
  message: "上传中...",
});
请求封装
可以为请求加入请求拦截与响应拦截,基于Taro.request
- 封装一些请求头,如
content-type: application/json - 提取
baseURL,将请求前缀提取出来配置,方便修改 请求拦截器:将 sessionId 注入到请求头响应拦截器:只给 errCode 为 200 的请求通过,其余请求为错误请求,直接使用 Notify 组件自动弹出错误信息
参考代码如下:
// fetch.js
import Taro from "@tarojs/taro";
import Notify from "../components/vant/notify/notify";
const interceptor = function (chain) {
  const requestParams = chain.requestParams;
  const sessionId = Taro.getStorageSync("sessionId");
  if (sessionId) requestParams.header.sessionId = sessionId;
  return chain.proceed(requestParams).then(
    (res) => {
      const data = res.data;
      if (data.errCode === 200) {
        return Promise.resolve(data.data);
      } else {
        Notify({
          type: "danger",
          selector: "#van-notify",
          message: data.errMsg,
          duration: 1000,
        });
        return Promise.reject(data.errMsg);
      }
    },
    (err) => {
      Notify({
        type: "danger",
        selector: "#van-notify",
        message: "服务端异常",
        duration: 1000,
      });
      return err.toString();
    }
  );
};
Taro.addInterceptor(interceptor);
export const baseURL = "http://localhost:5001/storage";
export const instance = (method, url, data, options) => {
  return Taro.request({
    dataType: "json",
    header: {
      "content-type": "application/json",
    },
    method,
    url: baseURL + url,
    data,
    ...options,
  });
};
将封装的实例像全局组件那样挂载到 Vue 的实例上,方便使用。
// app.js
import Vue from "vue";
// ...
import { instance, baseURL } from "./utils/fetch";
// ...
Vue.prototype.$get = (url, data, options) =>
  instance("get", url, data, options);
Vue.prototype.$post = (url, data, options) =>
  instance("post", url, data, options);
Vue.prototype.$baseURL = baseURL;
// ...
const App = new Vue({
  store,
  onShow(options) {},
  render(h) {
    return h("block", this.$slots.default);
  },
});
export default App;
然后就在 vue 中使用:
// get
this.$get("/getFileList", {
  currentPath: this.currentPathParams,
}).then((data) => {
  this.fileList = data;
});

//post
this.$post("/delete", {
  deleteList,
}).then((data) => {
  this.$notify({ type: "success", message: "操作成功", duration: 1000 });
  this.$emit("onNeedRefresh");
});
关于文件上传
微信的文件上传并不能拿到文件实例,查了好多资料,并无找到能够进行文件分片的功能,所有不能实现断点续传了。这次直接使用了简单的单文件上传,后端添加了一个 simpleUpload 接口接收,其余操作在这就不细说了。
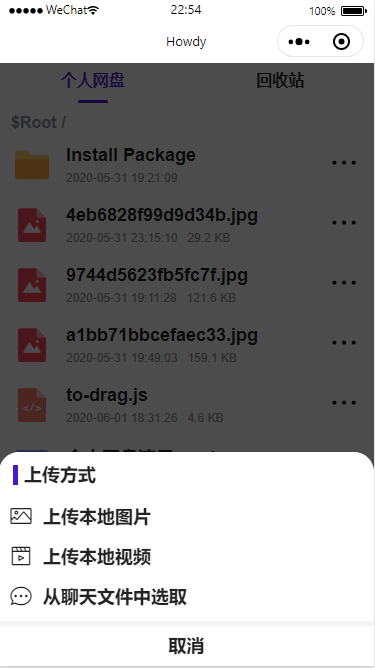
微信并无提供直接调用系统文件管理器的 API(可能也没权限),这次采用了微信提供的以下几种方式取代
- wx.chooseImage: 从本地相册选择图片或使用相机拍照
- wx.chooseVideo: 拍摄视频或从手机相册中选视频
- wx.chooseMessageFile: 从客户端会话选择文件
这几个接口都会返回一个含有选取路径的成功回调,能拿到文件路径进行上传
上传逻辑
handleUploadFile (type = 1) {
const callback = (res) => {
this.$emit('update:actionVisible', false)
this.$toast.loading({
mask: true,
message: '上传中...'
})
const filePaths = type === 3 ? res.tempFiles.map(item => item.path) : res.tempFilePaths
Promise.all(
filePaths.map(item => {
return Taro.uploadFile({
url: this.$baseURL + '/simpleUpload',
filePath: item,
name: 'file',
formData: {
targetPath: this.currentPathArr.join('/')
},
header: {
sessionid: Taro.getStorageSync('sessionId')
}
}).then(data => {
try {
const res = JSON.parse(data.data)
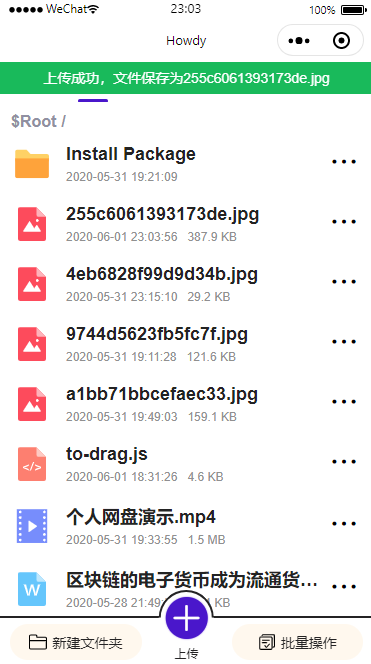
if (res.errCode === 200) {
const { fileName } = res.data
this.$notify({ type: 'success', message: `上传成功,文件保存为${fileName}`, duration: 2000 })
this.$emit('onNeedRefresh')
} else {
this.$notify({ type: 'success', message: `上传失败,${res.errMsg}`, duration: 2000 })
}
} catch (e) {
this.$notify({ type: 'success', message: `上传失败,服务端错误`, duration: 2000 })
}
})
})
).then(() => {
this.$toast.clear()
})
}
if (type === 1) {
wx.chooseImage({
count: 1,
sizeType: ['original', 'compressed'],
sourceType: ['album', 'camera'],
success (res) {
callback(res)
}
})
} else if (type === 2) {
wx.chooseVideo({
sourceType: ['album', 'camera'],
maxDuration: 60,
camera: 'back',
success (res) {
callback(res)
}
})
} else if (type === 3) {
wx.chooseMessageFile({
count: 1,
success (res) {
callback(res)
}
})
}
}文件预览
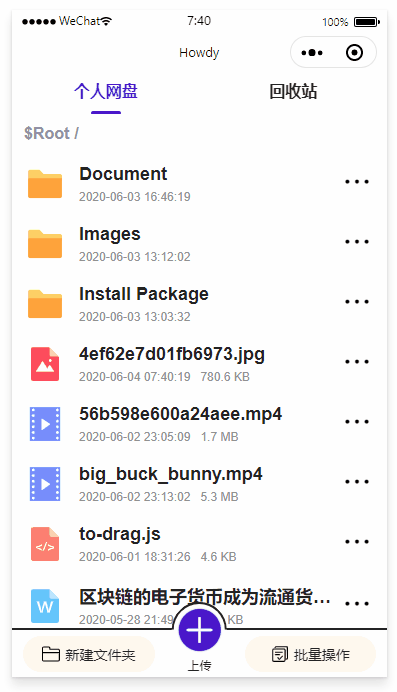
由于微信小程序文件存储最大为 10M,所以基本不可能实现下载功能了。于是把下载功能改成了在线预览功能,当前支持以下几种文件类型
- 办公文档(doc、docx、xls、xlsx、ppt、pptx、pdf):这几种文档都可以通过
Taro.openDocumentAPI 实现预览操作 - 图片(jpg、png、svg、gif):拿到图片临时地址后,使用浮层和
image组件显示 - 视频(mp4、mov、m4v、3gp、avi、m3u8):直接将视频地址放到浮层的
video组件中显示
以上,除了视频外,其余都是要先通过wx.downloadFile将文件下载到本地生成临时路径再执行相应预览操作,这时候可以添加下载进度条优化用户体验。而视频不会直接进行下载,需要后端将视频资源设为流视频(Accept-Range),这样视频可以一边下载一边播放。
进度条使用微信原生请求事件onProgressUpdate实现
主要代码
handleActionPreview (el) {
  const target = this.actionFileInfo
  const targetPath = this.currentPathArr.join('/') + '/' + target.fileName
  const realPath = targetPath.replace('$Root', this.$baseURL)
  const sessionId = Taro.getStorageSync('sessionId')
  if (videoSuffixArr.includes(target.suffix)) {
    // 视频直接展示
    this.handleActionCancel()
    this.mediaPreviewVisible = 2
    this.videoPreviewURL = realPath + '?sessionid=' + Taro.getStorageSync('sessionId')
  } else if (this.previewArr.includes(target.suffix)) {
    // 其他类型先下载
    this.downloadTask = wx.downloadFile({
      url: realPath,
      header: {
        'sessionid': sessionId
      },
      success: (data) => {
        const { tempFilePath } = data
        if (imgSuffixArr.includes(target.suffix)) {
          this.mediaPreviewVisible = 1
          this.imgPreviewURL = tempFilePath
        } else if (documentSuffixArr.includes(target.suffix)) {
          Taro.openDocument({
            filePath: tempFilePath
          })
        }
        this.handleActionCancel()
      },
      fail: () => {
        this.$notify({ type: 'danger', message: `下载失败`, duration: 2000 })
      }
    })
    this.downloadTask.onProgressUpdate((res) => {
      this.isDownloading = true
      const { progress, totalBytesWritten, totalBytesExpectedToWrite } = res
      this.downloadingInfo = { progress, totalBytesWritten, totalBytesExpectedToWrite }
    })
  }
}
PS:后端是 Koa 服务,使用了koa-range为静态资源下的视频实现分段请求功能,视频就可以一边下载一边播放,在 chrome 中视频可以进行拖动进度条,若不使用这个,在 chrome 中视频是无法拖动进度条的。
其余功能
批量操作
使用了 van-checkgroup 实现,直接更换当前文件列表,但尽量保持节点位置没发生改变,可防止界面回流影响性能。
移动文件
该功能对应 PC 端上的移动,可以选择文件仅移动或者是复制,PC 端是使用一个树形组件进行选择文件夹。但发现 Vant 等并没有相关树形组件,可能需要自己封装一个,然后直接采用了用户点击移动操作后,记录选择的文件信息,然后用户需要进入到相应目录下进行粘贴操作。
关于打包发布
执行命令npm run build:weapp后,其余操作与正常小程序一样。